BeipMU: Difference between revisions
m →Chat separator: Fixed Page Separator having two \ and added the Links channel to Chat separator |
|||
| (4 intermediate revisions by one other user not shown) | |||
| Line 24: | Line 24: | ||
This utilises the pseudo-[[GMCP]] support currently in place as a beta-level feature on Flexible Survival. | This utilises the pseudo-[[GMCP]] support currently in place as a beta-level feature on Flexible Survival. | ||
BeipMU supports emulating the Pueblo protocol, which FS utilizes for interactive hyperlinks inside of the client. | BeipMU supports emulating the Pueblo protocol, which FS utilizes for interactive hyperlinks inside of the client. If it's not enabled automatically for you, simply type <code>puebloclient</code> to force enable it. | ||
== Chat separator == | == Chat separator == | ||
| Line 42: | Line 42: | ||
FindString | FindString | ||
{ | { | ||
MatchText="^\\[(Public|WC|Newbie|LFG|Theme|Market|Badges|Dev|Pickup|RP|Naughty|Judge)\\] (.+)$" | MatchText="^\\[(Public|Party|WC|Newbie|LFG|Theme|Market|Badges|Dev|Pickup|RP|Naughty|Judge|Links)\\] (.+)$" | ||
RegularExpression=true | RegularExpression=true | ||
MatchCase=true | MatchCase=true | ||
| Line 72: | Line 72: | ||
FindString | FindString | ||
{ | { | ||
MatchText="^( | MatchText="^(\S+ page|In a page-pose)" | ||
RegularExpression=true | RegularExpression=true | ||
MatchCase=true | MatchCase=true | ||
| Line 118: | Line 118: | ||
} | } | ||
</nowiki> | </nowiki> | ||
== Adding Your Own Triggers == | |||
When you right-click any text in your feed, the context menu that pops up will have an option on it labelled <code>Trigger on text</code>. This little option can be used as a starting point for your own scripts- Tailored for whatever use you might have in mind. | |||
Take, for example, the battle clear message that pops up at the end of every combat encounter. Say, for example, you wanted to get the boxing information for that battle ''right'' before the combat expires- While the game is still rolling your rewards. Sure, you could type out <code>boxing detail</code> on the last round- But what if you're on Auto, and testing out that new AI configuration? What if you just want to have that information printed out for you at the end of every combat, without any fuss. | |||
This is where triggers come in. As with the chat separator above, we can tell BeipMU to look for a specific bit of text- And then do something when it sees that text in your feed. In this case, we want to tell Beip to send a command for us when the combat ends. | |||
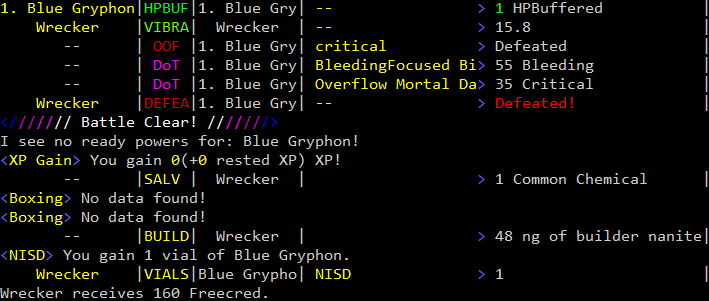
First steps first, figure out what text you want to use for the trigger. In this case, we have something that's nice and simple. Dead straightforward. It's been mentioned a few times already. The <code>Battle Clear!</code> message. | |||
[[File:Beip_Battleclear_01.png]] | |||
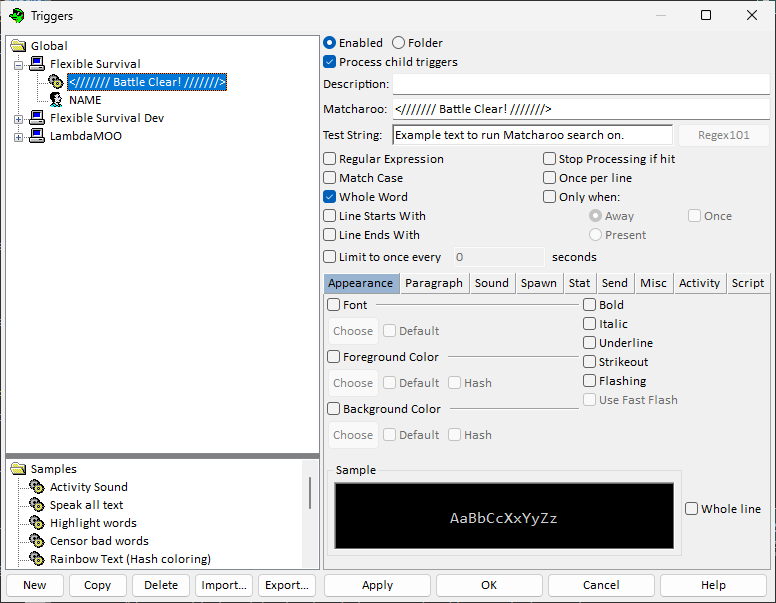
Highlight this- Chevrons and slashes and all. It's the fingerprint that our trigger will be looking for. Now, when you right click the highlighted text, you will find that the context menu that opens up will have the option <code>Trigger on text:</code>. Click this. It will bring you to a new window- A familiar one, if you've set up the chat separator above. | |||
[[File:Triggers_new.png]] | |||
This is the beginning of a new trigger. You can see there are several options here. Notice that BeipMU has automatically populated the <code>Matcharoo</code> field for you- This field tells BeipMU what to look for- And as it's using the string we just highlighted, this means it's now looking for the right text! Now all we need to do is actually make this trigger do something. | |||
The text field right below that is useful for actually ''testing'' the trigger condition. Type in whatever you like, and nothing will happen... But if you copy the text for the trigger, and paste it into that field, it'll be automatically highlighted. Neat! This isn't super important with such a simple string match- But more complicated trigger conditions can indeed be set up, and this field is very helpful in evaluating them. | |||
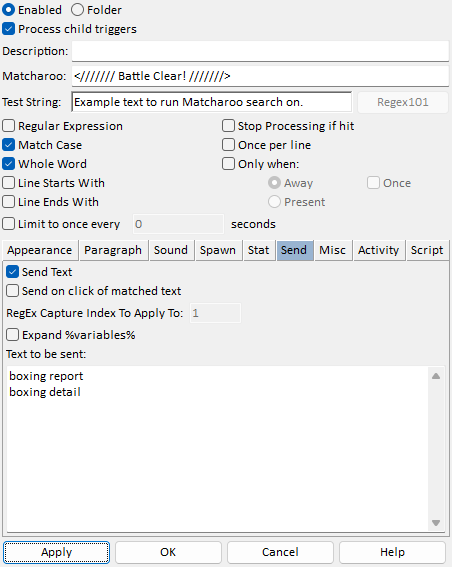
[[File:Beip_Triggers_settings.png]] | |||
First, as a personal preference, I toggled the <code>Match Case</code> tick box. This makes Matcharoo a bit more strict which, in this case, isn't really a bad thing. Next, look down at the ribbon menu, and select <code>send</code>. This tab lets us set BeipMU up to send a command for us, when the trigger executes. How convenient! Go ahead and toggle this on, and enter <code>boxing report</code> and <code>boxing detail</code>. Now Beip knows what to ''do''. | |||
Now, hit apply... | |||
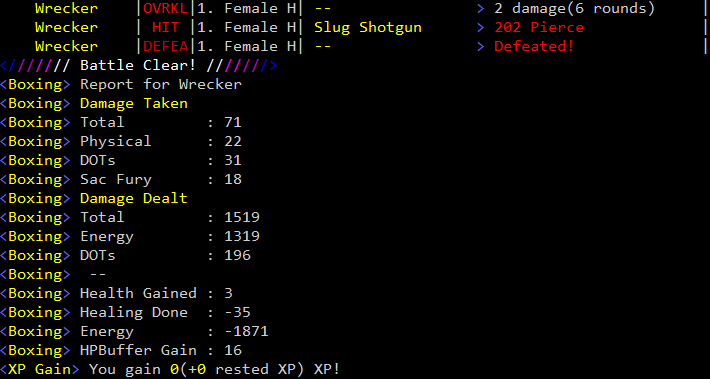
... And, finally, click and drag that new script onto your character to activate it. Go ahead, get into a fight, and see what happens! | |||
[[File:Beip_Battleclear_02.png]] | |||
Of course, you can't do everything with a quick string-match, and a handy command... Well, when the simple things don't quite work out, you can always refer to Beip's [https://github.com/BeipDev/BeipMU/blob/master/Documentation/Triggers.md official documentation] for all of the bells and whistles! | |||
[[Category:UI Guides]] | [[Category:UI Guides]] | ||
Latest revision as of 20:53, 20 November 2025
BeipMU is a MUCK client available from https://beipdev.github.io/BeipMU/ for Windows systems, although most features also runs very well under Wine on Linux and MacOS. There is also a Discord server available for assistance in using it.
Useful features
- 256-color support
- SSL/TLS connections
- Scriptable
- Designed for ease of use
- Experimental Pueblo support
- Supports stat panes from Flexible Survival with zero setup!
Quickstart
- In the connection window, add a new server and fill in
flexiblesurvival.com:2002as the port. (Other ports listed on the main page will work too, but lack SSL/TLS support.) - Create a new character under that server. Enter your password in the relevant field, and then enter the following connect string-
connect <name> %PASSWORD%,<name>is your character's name.%PASSWORD%is auto-filled by BeipMU using the password you entered above. - Click 'Connect'
Special features

Fully automated stat panes! Just run the command livestats #on after connecting, and some additional windows should appear showing you various attributes of your character. The information within will also update in (near-)realtime.
This utilises the pseudo-GMCP support currently in place as a beta-level feature on Flexible Survival.
BeipMU supports emulating the Pueblo protocol, which FS utilizes for interactive hyperlinks inside of the client. If it's not enabled automatically for you, simply type puebloclient to force enable it.
Chat separator
Save the following to a file and use Options->Triggers->Import, or copy+paste into a new trigger.
Version=301
Connections
{
  Triggers
  {
    {
      Description="Chat separator"
      Example="[Public] This is a test message	"
      OncePerLine=true
      FindString
      {
        MatchText="^\\[(Public|Party|WC|Newbie|LFG|Theme|Market|Badges|Dev|Pickup|RP|Naughty|Judge|Links)\\] (.+)$"
        RegularExpression=true
        MatchCase=true
      }
      Spawn
      {
        Active=true
        Title="\\1"
        TabGroup="Comm channels"
      }
    }
  }
}
If you want to have pages appear in one of the tabs, save this alongside the above script:
Version=308
Connections
{
  Triggers
  {
    {
      Description="Page separator"
      Example="Dre'ji pages, \"Indeed!\""
      StopProcessing=true
      OncePerLine=true
      FindString
      {
        MatchText="^(\S+ page|In a page-pose)"
        RegularExpression=true
        MatchCase=true
      }
      Spawn
      {
        Active=true
        Title="Pages"
        TabGroup="Comm channels"
      }
      Triggers.Active=false
    }
  }
}
And, for OOC chat:
Version=308
Connections
{
  Triggers
  {
    {
      Description="OOC separator"
      Example="<OOC> Zelmra pouts!"
      StopProcessing=true
      OncePerLine=true
      FindString
      {
        MatchText="^(<OOC>)"
        RegularExpression=true
        MatchCase=true
      }
      Spawn
      {
        Active=true
        Title="OOC"
        TabGroup="Comm channels"
      }
      Triggers.Active=false
    }
  }
}
Adding Your Own Triggers
When you right-click any text in your feed, the context menu that pops up will have an option on it labelled Trigger on text. This little option can be used as a starting point for your own scripts- Tailored for whatever use you might have in mind.
Take, for example, the battle clear message that pops up at the end of every combat encounter. Say, for example, you wanted to get the boxing information for that battle right before the combat expires- While the game is still rolling your rewards. Sure, you could type out boxing detail on the last round- But what if you're on Auto, and testing out that new AI configuration? What if you just want to have that information printed out for you at the end of every combat, without any fuss.
This is where triggers come in. As with the chat separator above, we can tell BeipMU to look for a specific bit of text- And then do something when it sees that text in your feed. In this case, we want to tell Beip to send a command for us when the combat ends.
First steps first, figure out what text you want to use for the trigger. In this case, we have something that's nice and simple. Dead straightforward. It's been mentioned a few times already. The Battle Clear! message.
Highlight this- Chevrons and slashes and all. It's the fingerprint that our trigger will be looking for. Now, when you right click the highlighted text, you will find that the context menu that opens up will have the option Trigger on text:. Click this. It will bring you to a new window- A familiar one, if you've set up the chat separator above.
This is the beginning of a new trigger. You can see there are several options here. Notice that BeipMU has automatically populated the Matcharoo field for you- This field tells BeipMU what to look for- And as it's using the string we just highlighted, this means it's now looking for the right text! Now all we need to do is actually make this trigger do something.
The text field right below that is useful for actually testing the trigger condition. Type in whatever you like, and nothing will happen... But if you copy the text for the trigger, and paste it into that field, it'll be automatically highlighted. Neat! This isn't super important with such a simple string match- But more complicated trigger conditions can indeed be set up, and this field is very helpful in evaluating them.
First, as a personal preference, I toggled the Match Case tick box. This makes Matcharoo a bit more strict which, in this case, isn't really a bad thing. Next, look down at the ribbon menu, and select send. This tab lets us set BeipMU up to send a command for us, when the trigger executes. How convenient! Go ahead and toggle this on, and enter boxing report and boxing detail. Now Beip knows what to do.
Now, hit apply...
... And, finally, click and drag that new script onto your character to activate it. Go ahead, get into a fight, and see what happens!
Of course, you can't do everything with a quick string-match, and a handy command... Well, when the simple things don't quite work out, you can always refer to Beip's official documentation for all of the bells and whistles!


